学习视频 黑马程序员Maven全套教程
基本概念 POM:Project Object Model依赖管理和项目构建
相关目录结构 1 2 3 4 5 6 7 8 9 10 11 12 13 14 15 16 17 project |-- pom.xml |-- src | |-- main | | |-- java | | | `-- ml | | | `-- lightly | | | `-- App.java | | `-- resources | | `-- my.properties | `-- test | |-- java | | `-- ml | | `-- lightly | | `-- AppTest.java | `-- resources 测试程序专用的配置或资源 `-- target
maven目录 1 2 3 4 5 6 7 8 9 10 11 12 13 14 15 16 17 18 19 |-- bin | |-- m2.conf | |-- mvn 执行构建的脚本 | |-- mvn.cmd | |-- mvnDebug | |-- mvnDebug.cmd | `-- mvnyjp |-- boot | |-- plexus-classworlds-2.6.0.jar maven的类加载器 | `-- plexus-classworlds.license |-- conf | |-- logging | | `-- simplelogger.properties | |-- settings.xml | `-- toolchains.xml `-- lib maven运行所需要的jar包 |-- commons-cli-1.4.jar |-- 。。。 `-- wagon-provider-api-3.4.3.jar
仓库 本地仓库(本地从私人仓库获取)
坐标 groupId下的artifactId下的version就有jar包了
本地仓库配置 在settings.xml修改配置
1 2 3 4 5 6 <settings xmlns ="http://maven.apache.org/SETTINGS/1.2.0" xmlns:xsi ="http://www.w3.org/2001/XMLSchema-instance" xsi:schemaLocation ="http://maven.apache.org/SETTINGS/1.2.0 https://maven.apache.org/xsd/settings-1.2.0.xsd" > <localRepository > /home/easul/.ivy2/cache</localRepository > </settings >
远程仓库配置 在maven的lib目录下有一个maven-model-builder-3.8.4.jar,里边的pom-4.0.0.xml定义了默认的远程仓库地址
1 2 3 4 5 6 7 8 9 10 11 <repositories > <repository > <id > central</id > <name > Central Repository</name > <url > https://repo.maven.apache.org/maven2</url > <layout > default</layout > <snapshots > <enabled > false</enabled > </snapshots > </repository > </repositories >
但是因为很慢,所以可以定义加速镜像仓库。settings.xml修改配置
1 2 3 4 5 6 7 8 9 10 11 12 13 14 15 16 17 <mirrors > <mirror > <id > alimaven</id > <mirrorOf > central</mirrorOf > <name > aliyun maven</name > <url > http://maven.aliyun.com/nexus/content/repositories/central/</url > </mirror > <mirror > <id > nexus-aliyun</id > <mirrorOf > *</mirrorOf > <name > Nexus aliyun</name > <url > http://maven.aliyun.com/nexus/content/groups/public</url > </mirror > </mirrors >
在maven目录的conf下是全局settings.xmlsettings.xml是用户自定义的局部配置文件~/.m2/repository,配置文件就放到~/.m2
maven项目制作 项目目录结构可参考这里
1 2 3 4 5 6 7 8 9 10 11 12 mkdir -p ~/project/src/main/javamkdir -p ~/project/src/main/resourcesmkdir -p ~/project/src/test/javamkdir -p ~/project/src/test/resourcesmkdir -p ~/project/src/main/java/ml/lightly/demotouch ~/project/src/main/java/ml/lightly/demo/Demo.javamkdir -p ~/project/src/test/java/ml/lightly/demotouch ~/project/src/test/java/ml/lightly/demo/DemoTest.javatouch ~/project/pom.xml
实际类
1 2 3 4 5 6 7 package ml.lightly.demo;public class Demo { public String say (String name) { return "hello" + name; } }
测试类相关代码
1 2 3 4 5 6 7 8 9 10 11 12 13 14 15 16 package ml.lightly.demo;import ml.lightly.demo.Demo;import org.junit.Test;import org.junit.Assert;public class DemoTest { @Test public void testSay () { Demo d = new Demo (); String str = d.say("maven" ); Assert.assertEquals("hello maven" , str); } }
pom.xml
1 2 3 4 5 6 7 8 9 10 11 12 13 14 15 16 17 18 19 20 21 22 23 <?xml version="1.0" encoding="UTF-8" ?> <project xmlns ="http://maven.apache.org/POM/4.0.0" xmlns:xsi ="http://www.w3.org/2001/XMLSchema-instance" xsi:schemaLocation ="http://maven.apache.org/POM/4.0.0 http://maven.apache.org/maven-v4_0_0.xsd" > <modelVersion > 4.0.0</modelVersion > <groupId > ml.lightly</groupId > <artifactId > demo</artifactId > <version > 1.0-SNAPSHOT</version > <packaging > jar</packaging > <dependencies > <dependency > <groupId > junit</groupId > <artifactId > junit</artifactId > <version > 4.12</version > <scope > test</scope > </dependency > </dependencies > </project >
maven构建常用命令 1 2 3 4 5 6 7 8 9 10 11 12 13 14 15 16 17 18 19 20 21 22 23 24 25 26 27 28 29 30 31 32 33 34 35 mvn compile mvn clean mvn test mvn package mvn install
插件创建工程 需要在空目录创建工程
1 2 3 4 5 6 7 8 9 mvn archetype:generate -DgroupId=ml.lightly -DartifactId=java-project -DarchetypeArtifactId=maven-archetype-quickstart -Dversion=0.0.1-SNAPSHOT -DinteractiveMode=false mvn archetype:generate -DgroupId=ml.lightly -DartifactId=java-web -DarchetypeArtifactId=maven-archetype-webapp -Dversion=0.0.1-SNAPSHOT -DinteractiveMode=false
插件生成的java工程目录
1 2 3 4 5 6 7 8 9 10 11 12 13 . |-- pom.xml `-- src |-- main | `-- java | `-- ml | `-- lightly | `-- App.java `-- test `-- java `-- ml `-- lightly `-- AppTest.java
插件生成的web工程目录
1 2 3 4 5 6 7 8 9 . |-- pom.xml `-- src `-- main |-- resources `-- webapp |-- WEB-INF | `-- web.xml `-- index.jsp
依赖 依赖配置 1 2 3 4 5 6 7 8 <dependencies > <dependency > <groupId > junit</groupId > <artifactId > junit</artifactId > <version > 4.12</version > <scope > test</scope > </dependency > </dependencies >
依赖传递
依赖具有传递性
直接依赖: 当前项目的依赖
间接依赖: 依赖中引用的依赖,本项目是可以直接使用的
依赖传递冲突问题
即本项目和依赖项目用了相同的依赖,但版本不同
路径优先: 把依赖看成一棵树,如果依赖中出现了相同资源,层级越深,优先级越低(高层级依赖会覆盖低层级)
声明优先: 资源在相同层级被依赖,资源配置靠前的覆盖配置靠后的
特殊优先: 同级配置了相同资源的不同版本,后边覆盖前边的(如果一个pom写了同一个依赖的两个版本,后边覆盖前边的)
如果项目三依赖项目二,可以直接在dependency添加项目二的依赖
1 2 3 4 5 6 7 8 <dependencies > <dependency > <groupId > ml.lightly</groupId > <artifactId > demo-project-2</artifactId > <version > 0.0.1-SNAPSHOT</version > </dependency > </dependencies >
如果项目三需要的依赖在项目二中已经有了该依赖
1 2 3 4 5 6 7 8 9 10 11 12 13 14 15 16 17 18 19 <dependencies > <dependency > <groupId > junit</groupId > <artifactId > junit</artifactId > <version > 4.12</version > <scope > test</scope > </dependency > </dependencies > <dependencies > <dependency > <groupId > ml.lightly</groupId > <artifactId > demo-project-2</artifactId > <version > 0.0.1-SNAPSHOT</version > </dependency > </dependencies >
可选依赖 对外隐藏当前所依赖的资源,这样其他项目依赖该项目时,就无法使用该项目的依赖了
1 2 3 4 5 6 7 8 9 <dependencies > <dependency > <groupId > junit</groupId > <artifactId > junit</artifactId > <version > 4.12</version > <optional > true</optional > </dependency > </dependencies >
排除依赖 主动断开依赖的资源,不需要指定资源版本
1 2 3 4 5 6 7 8 9 10 11 12 13 14 15 16 17 18 19 20 21 22 23 24 25 26 <dependencies > <dependency > <groupId > junit</groupId > <artifactId > junit</artifactId > <version > 4.12</version > <scope > test</scope > </dependency > </dependencies > <dependencies > <dependency > <groupId > ml.lightly</groupId > <artifactId > demo-project-2</artifactId > <version > 0.0.1-SNAPSHOT</version > <exclusions > <exclusions > <groupId > junit</groupId > <artifactId > junit</artifactId > </exclusions > </exclusions > </dependency > </dependencies >
依赖范围
通过scope设置jar可以在哪个生命周期使用
作用范围
主程序有效(main文件夹范围)
测试程序有效(test文件夹范围)
是否参与打包(package指令范围,会打包到jar中)
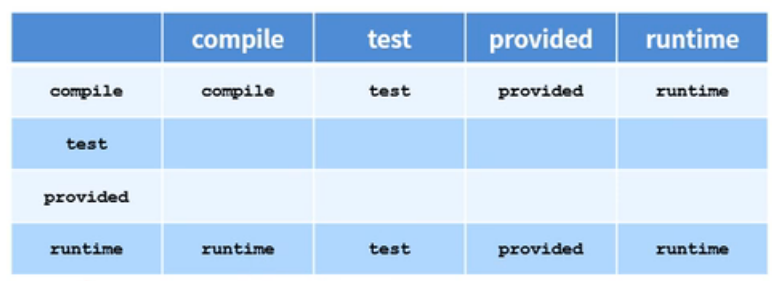
1 2 3 4 compile: 默认设置,主程序,测试程序,打包阶段都可用,如log4j test: 测试程序用,主程序,打包阶段不可用,如junit provided: 主程序,测试程序可用,打包阶段不可用,如servlet-api runtime: 打包阶段可用,主程序,测试程序不可用,如jdbc
1 2 3 4 5 6 7 8 <dependencies > <dependency > <groupId > junit</groupId > <artifactId > junit</artifactId > <version > 4.12</version > <scope > test</scope > </dependency > </dependencies >
如果项目二的依赖设置范围为test或provided,项目三依赖项目二,则无法看到该依赖compile或runtime,项目三依赖项目二,项目二可以看到该依赖
依赖范围传递性 横行是直接依赖的范围(项目三中的项目二),竖行是间接依赖的范围(项目二中的某些依赖),中间是组合后的结果(项目三中项目二依赖的范围)
项目构建的生命周期 1 2 3 clean: 清理工作 default: 核心工作,如编译,测试,打包,部署等 site: 产生报告,发布站点等
clean生命周期 1 2 3 pre-clean: 执行一些在clean之前完成的工作 clean: 移除上次构建生成的文件 post-clean: 执行一些clean之后立即完成的工作
default生命周期 下边的指令执行,就会导致上边的指令一同执行
1 2 3 4 5 6 7 8 9 10 11 12 13 14 15 16 17 18 19 20 21 22 23 validate: 验证项目是否正确且包含所有必要的信息可用于完成构建过程 initialize: 建立初始化状态,例如设置属性 generate-sources: 生成包含在编译阶段中的任何源代码 process-sources: 处理源代码,比如过滤任意值 generate-resources: 生成将会包含在项目包中资源文件 process-resources: 复制和处理资源到目标目录,准备打包阶段 compile: 编译该项目的源代码 process-classes: 处理编译生成的文件,例如Java类的字节码增强/优化 generate-test-sources: 生成包含在编译阶段中的任何测试源代码 process-test-sources: 处理测试源代码,例如过滤器任何值 generate-test-resources: 为测试创建资源文件 process-test-resources: 复制和处理测试资源到目标目录 test-compile: 编译测试源代码到测试目标目录 process-test-classes: 处理测试源码编译生成的文件 test: 使用合适的单元测试框架进行测试(JUnit) prepare-package: 在实际打包之前,执行任何必要的操作为打包做准备 package: 提取编译后的代码打包成可分发格式的文件,如JAR、WAR或EAR文件 pre-integration-test: 在执行集成测试前进行必要的动作。例如,设置所需的环境 integration-test: 处理和部署项目到可以运行的集成测试环境 post-integration-test: 在执行集成测试完成后的必要动作。例如:清理集成测试环境 verify: 运行任何检查,验证包是有效的,符合质量审核规定 install: 将包安装到本地存储库,它可以用作本地其他项目的依赖 deploy: 复制最终的包到远程仓库与其他开发者和项目共享
site生命周期 1 2 3 4 pre-site: 执行一些需要在生成站点文档之前完成的工作 site: 生成项目的站点文档 post-site: 执行一些需要在生成站点文档之后完成的工作,为部署做准备 site-deploy: 将生成的站点文档部署到特定服务器
插件
插件与生命周期内的阶段绑定,执行到对应生命周期,则执行相应插件
默认maven在各个生命周期都绑定有预设的功能
通过插件也可以自定义其他功能(需要在pom.xml中配置)
maven的插件库 提供了所有插件,如有需要可以参考
打包源码插件 1 2 3 4 5 6 7 8 9 10 11 12 13 14 15 16 17 18 19 20 21 22 23 24 25 26 <build > <plugins > <plugin > <groupId > org.apache.maven.plugins</groupId > <artifactId > maven-source-plugin</artifactId > <version > 3.2.0</version > <executions > <execution > <goals > <goal > jar</goal > <goal > test-jar</goal > </goals > <phase > generate-test-resources</phase > </execution > </executions > </plugin > </plugins > </build >
编译插件 1 2 3 4 5 6 7 8 9 10 11 <plugin > <groupId > org.apache.maven.plugins</groupId > <artifactId > maven-compiler-plugin</artifactId > <version > 3.1</version > <configuration > <source > 1.8</source > <target > 1.8</target > </configuration > </plugin >
tomcat插件 在这里 搜索tomcat maven,找到org.apache.tomcat.maven字样,然后点击该链接进入Apache Tomcat Maven Plugin :: Tomcat 7.x点击进入,8.x可以用页面下边的其他包
1 2 3 4 5 6 7 8 9 10 11 12 13 14 15 16 17 18 19 20 <build > <plugins > <plugin > <groupId > org.apache.tomcat.maven</groupId > <artifactId > tomcat7-maven-plugin</artifactId > <version > 2.1</version > <configuration > <port > 8091</port > <path > /</path > </configuration > </plugin > </plugins > </build >
跳过测试插件 用于跳过测试阶段
分模块开发与设计 如controller,dao,service等每个包都单独拆为一个工程模块,不放到一起开发
1 2 3 4 5 6 7 8 9 10 11 |-- ssm | |-- pom.xml | `-- ssm.imi |-- ssm_controller | |-- src | |-- pom.xml | `-- ssm_controller.imi `-- ssm_dao |-- src |-- pom.xml `-- ssm_dao.imi
模块拆分问题
如果将已有的项目拆分成子模块,一个子模块pom中引用另一个子模块,编译的时候报错,是因为在本地仓库没有找到这个模块mvn install先将该模块安装到本地仓库
多模块构建维护 1 2 3 4 `-- ssm_controller `-- ssm_service `-- ssm_dao `-- ssm_pojo
模块间有依赖关系,假如一个模块更新,其他模块可能无法使用聚合)pom.xml即可
1 2 3 4 5 6 7 8 9 10 11 12 13 14 15 16 17 18 <project xmlns ="http://maven.apache.org/POM/4.0.0" xmlns:xsi ="http://www.w3.org/2001/XMLSchema-instance" xsi:schemaLocation ="http://maven.apache.org/POM/4.0.0 http://maven.apache.org/maven-v4_0_0.xsd" > <modelVersion > 4.0.0</modelVersion > <groupId > ml.lightly</groupId > <artifactId > ssm</artifactId > <version > 0.0.1-SNAPSHOT</version > <packaging > pom</packaging > <modules > <modules > ssm_controller</modules > <modules > ssm_service</modules > </modules > </project >
继承 用于保证子模块之间用的依赖版本相同,且可以沿用父工程配置
1 2 3 4 5 6 7 8 9 10 11 12 13 14 15 16 17 18 19 20 21 22 23 24 25 26 27 28 29 30 31 32 33 34 35 36 37 38 39 40 41 42 43 44 45 46 47 48 49 50 51 52 53 54 55 56 57 58 59 60 61 62 63 64 65 66 67 68 69 70 71 72 73 74 75 76 77 78 79 80 81 82 83 84 <project xmlns ="http://maven.apache.org/POM/4.0.0" xmlns:xsi ="http://www.w3.org/2001/XMLSchema-instance" xsi:schemaLocation ="http://maven.apache.org/POM/4.0.0 http://maven.apache.org/maven-v4_0_0.xsd" > <packaging > pom</packaging > <dependencyManagement > <dependencies > <dependency > <groupId > ml.lightly</groupId > <artifactId > ssm_dao</artifactId > <version > 1.0-SNAPSHOT</version > </dependency > <dependency > <groupId > junit</groupId > <artifactId > junit</artifactId > <version > 4.12</version > <scope > test</scope > </dependency > </dependencies > </dependencyManagement > <build > <pluginManagement > <plugins > <plugin > <groupId > org.apache.tomcat.maven</groupId > <artifactId > tomcat7-maven-plugin</artifactId > <version > 2.1</version > <configuration > <port > 8091</port > <path > /</path > </configuration > </plugin > </plugins > </pluginManagement > </build > </project > <project xmlns ="http://maven.apache.org/POM/4.0.0" xmlns:xsi ="http://www.w3.org/2001/XMLSchema-instance" xsi:schemaLocation ="http://maven.apache.org/POM/4.0.0 http://maven.apache.org/maven-v4_0_0.xsd" > <parent > <groupId > ml.lightly</groupId > <artifactId > ssm</artifactId > <version > 0.0.1-SNAPSHOT</version > <relationPath > ../ssm/pom.xml</relationPath > </parent > <artifactId > ssm</artifactId > <dependencies > <dependency > <groupId > ml.lightly</groupId > <artifactId > ssm_dao</artifactId > </dependency > <dependency > <groupId > junit</groupId > <artifactId > junit</artifactId > <scope > test</scope > </dependency > </dependencies > <build > <plugins > <plugin > <groupId > org.apache.tomcat.maven</groupId > <artifactId > tomcat7-maven-plugin</artifactId > </plugin > </plugins > </build > </project >
子模块继承的资源 1 2 3 4 5 6 7 8 9 10 11 12 13 14 15 16 17 18 19 groupId: 组织ID version: 项目版本 description: 项目描述信息 organization: 项目组织信息 inceptionYear: 项目创始年份 url: 项目URL地址 developers: 项目开发者信息 contributors: 项目贡献者信息 distributionManagement: 项目部署配置 issueManagement: 项目缺陷跟踪系统信息 ciManagement: 项目的持续集成系统信息 scm: 项目的版本控制系统信息 mailingLists: 项目的邮件列表信息 properties: 自定义Maven属性 dependencies: 项目的依赖配置 dependencyManagement: 项目的依赖管理配置 repositories: 项目的仓库配置 build: 项目源码目录配置,输出目录配置,插件配置,插件管理配置等 reporting: 项目报告输出目录配置,报告插件配置等
继承与聚合
作用
相同点
继承和聚合的打包方式都是pom
聚合和继承都是设计型模块,没有实际模块内容
不同
聚合在父模块配置关系,可以看到子模块都有哪些
继承在子模块配置关系,父模块不知道谁继承了自己的配置
属性 pom中的变量,例如:可以指定jar包的版本号(版本号仓库需要有,不然会去自动下载新版本的jar)
1 2 3 4 5 6 7 8 9 10 11 12 13 14 15 16 17 18 19 20 21 <properties > <springboot.version > 5.1.9.RELEASE</springboot.version > <junit.version > 4.12</junit.version > </properties > <dependencies > <dependency > <groupId > ml.lightly</groupId > <artifactId > ssm_dao</artifactId > <version > ${version}</version > </dependency > <dependency > <groupId > junit</groupId > <artifactId > junit</artifactId > <version > ${junit.version}</version > </dependency > </dependencies >
属性分类
自定义属性1 2 3 4 5 6 7 8 9 10 11 12 13 <properties > <springboot.version > 5.1.9.RELEASE</springboot.version > <junit.version > 4.12</junit.version > </properties > <dependency > <groupId > junit</groupId > <artifactId > junit</artifactId > <version > ${junit.version}</version > </dependency >
内置属性1 2 3 4 5 ${basedir} ${version}
Setting属性1 2 3 ${settings.localRepository}
Java系统属性
环境变量属性
版本管理 1 2 3 4 5 6 7 SNAPSHOT: 快照版本,未完成版,需要大写,发布的时候才能识别版本 RELEASE: 发布版本,完成版,需要大写,发布的时候才能识别版本 工程版本号约定: <主版本>.<次版本>.<增量版本>.<里程碑版本> - 主版本: 项目有重大架构的变更(spring5与spring4的区别) - 次版本: 有较大的功能增加和变化,或全面系统的修复漏洞 - 增量版本: 表示有重大漏洞的修复,临时修改下 - 里程碑版本: 一个版本的里程碑
资源配置 主要用于配置其他配置文件的内容
1 2 3 4 5 6 7 8 9 10 11 12 13 14 15 16 17 18 19 20 21 22 23 24 25 26 27 28 29 30 <properties > <jdbc.url > jdbc:mysql://127.0.0.1:3306/ssm_db</jdbc.url > </properties > <build > <resources > <resource > <directory > ${project.basedir}/src/main/resources</directory > <filtering > true</filtering > </resource > </resources > <testResources > <testResource > <directory > ${project.basedir}/src/test/resources</directory > <filtering > true</filtering > </testResource > </testResources > </build >
1 2 <!-- 在其他文件就可以直接使用pom中定义的变量了,需要先在pom中进行资源配置 --> jdbc.url =${jdbc.url}
多环境兼容 生产环境,开发环境,测试环境用不同的配置
1 2 3 4 5 6 7 8 9 10 11 12 13 14 15 16 17 18 19 20 21 22 23 24 25 26 27 <profiles > <profile > <id > pro_env</id > <properties > <jdbc.url > jdbc:mysql://127.0.0.1:3306/ssm_db</jdbc.url > </properties > </profile > <profile > <id > dev_env</id > <properties > <jdbc.url > jdbc:mysql://192.168.3.2:3306/ssm_db</jdbc.url > </properties > <activation > <activeByDefault > true</activeByDefault > </activation > </profile > </profiles >
pom中定义好环境之后,想要在不同的情况下用不用的环境可以如下操作
1 2 3 mvn package -P dev_env
跳过测试 用于已经有了测试用例,但是代码还没有开发完,或者快速打包等
用命令指出跳过测试 1 2 mvn install -D skipTests
pom指出跳过测试 也就是跳过测试插件的使用
1 2 3 4 5 6 7 8 9 10 11 12 13 14 15 16 17 18 19 20 21 22 23 24 25 <build > <plugins > <plugin > <groupId > org.apache.maven.plugins</groupId > <artifactId > maven-surefire-plugin</artifactId > <version > 2.12.4</version > <configuration > <includes > <include > **/DemoTest.java</include > </includes > <excludes > <exclude > </exclude > </excludes > </configuration > </plugin > </plugins > </build >
私服 安装 1 2 3 4 5 6 7 8 9 10 11 12 13 14 15 16 17 18 19 20 21 22 mkdir ~/software && cd ~/softwaremkdir nexuscd nexuswget https://download.sonatype.com/nexus/3/nexus-3.38.0-01-unix.tar.gz tar -zxvf nexus-3.38.0-01-unix.tar.gz rm -rf nexus-3.38.0-01-unix.tar.gzcd ~/software/nexus/nexus-3.38.0-01/bin./nexus run nexus vi ~/software/nexus/nexus-3.38.0-01/etc/nexus-default.properties vi ~/software/nexus/nexus-3.38.0-01/bin/nexus.vmoptions
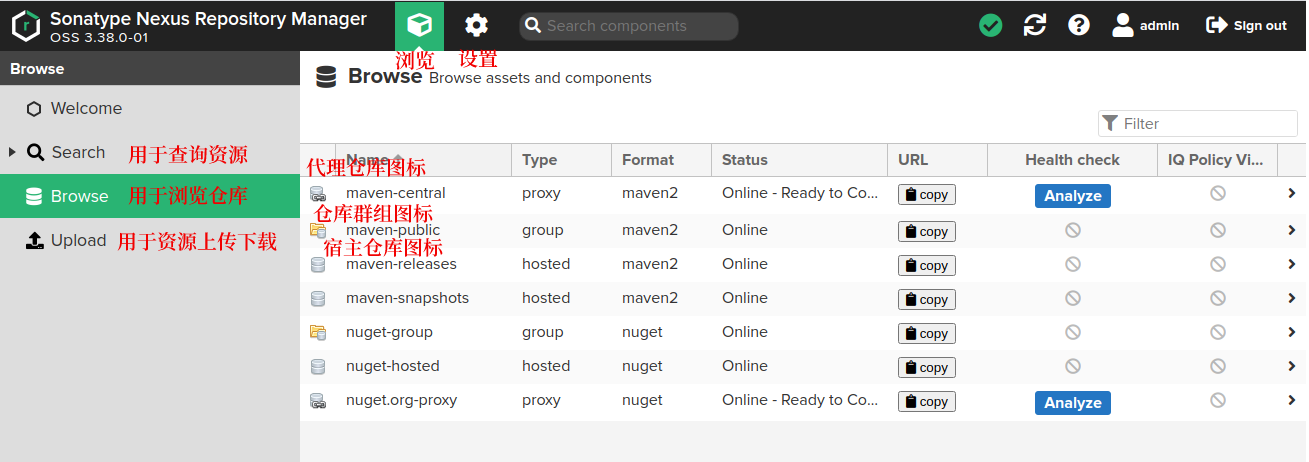
资源获取 自己的包可以上传到私服的某个仓库
1 2 3 4 5 6 7 宿主仓库: 放无法从中央仓库获取的资源,需要自己维护 - 用于放自主研发的资源 - 用于放第三方非开源项目 代理仓库: 通过nexus访问其他公共仓库(如中央仓库),然后缓存到本地 仓库组: 用于仓库的分类 - 将若干宿主仓库或代理仓库组成一个群组,简化配置 - 仓库组不保存资源,属于设计型仓库
先在ip:8081的右上角进行登录,用户名admin,密码在~/software/sonatype-work/nexus3/admin.password匿名访问可以关闭掉
界面简介
创建宿主仓库 主要创建的就是maven2的仓库Name可以写成local-release,表示本地的发布版仓库,然后拉到最后create repository
将仓库添加到群组 这样的话只访问群组就可以访问多个仓库了maven-public=》在下边的Members添加新仓库即可=》save
手动上传组件到仓库 浏览=》Upload=》选择local-release=》Browse选择jar包=》然后添加groupId,artifactId,versionGenerate a POM file with these coordinates可以勾选,会生成对应的pom文件=》Browse里的仓库就可以看到jar包了
删除组件 浏览=》Browse=》选择local-release=》选择目录或包=》点击右边的Delete即可
获取仓库组路径 浏览=》Browse=》点击仓库组右边的copy即可获取仓库组url路径
包的上传与下载
本地先将包安装到本地仓库,然后本地仓库将包发布到私服
发布到私服需要私服的用户名密码,以及私服的仓库路径
用户名密码是通用的,所以可以配置到maven的settings.xml
上传的仓库地址,每个项目不同,所以需要在pom.xml中指定
本地从私服下载依赖,都是本地仓库从一个仓库组下载
仓库组是公用的,可以配置到maven的settings.xml
从私服下载也需要用户名密码,配置到maven的settings.xml
本地仓库访问私服配置 在maven的settings.xml中配置私服访问权限,用于访问私服
1 2 3 4 5 6 7 8 9 10 11 12 13 14 15 16 17 18 <servers > <server > <id > local-release</id > <username > admin</username > <password > admin</password > </server > <server > <id > local-snapshot</id > <username > admin</username > <password > admin</password > </server > </servers >
配置什么样的资源来源于私服
1 2 3 4 5 6 7 8 9 10 11 12 13 14 15 16 17 18 19 <mirrors > <mirror > <id > nexus-aliyun</id > <mirrorOf > central</mirrorOf > <name > aliyun maven</name > <url > http://maven.aliyun.com/nexus/content/groups/public</url > </mirror > <mirror > <id > nexus-local</id > <mirrorOf > *</mirrorOf > <name > local</name > <url > http://ip:8081/repository/maven-public/</url > </mirror > </mirrors >
发布到私服的配置 1 2 3 4 5 6 7 8 9 10 11 12 13 14 15 16 17 18 19 <distributionManagement > <repository > <id > local-release</id > <url > http://ip:8081/repository/local-release/</url > </repository > <snapshotRepository > <id > local-snapshot</id > <url > http://ip:8081/repository/local-snapshot/</url > </snapshotRepository > </distributionManagement >
发布包到私服 私服报错 Could not download page bundle 设置=》System=》Capabilities=》Outreach Management=》修改为Disable